Imagine having the ability to alter the universe of Minecraft. The ability to modify the backdrop of the main screen and transform every single block. This skill is familiar to anyone who has used any of the Best Minecraft Texture Packs available. But only to a certain extent. Minecraft texture packs are a fantastic resource for entirely changing the look of your game, but customization choices are restricted to what the designer selects. However, if you want total control over Minecraft’s aesthetic, you may develop your own texture packs for Minecraft. If you’re interested, here’s how to produce a Minecraft texture pack.
Make a Minecraft Texture Pack: Explained (2023)
Texture packs are fantastic since they enable you to modify the textures of anything from creatures to blocks and even liquids, allowing you to transform your Minecraft into an entirely other game. In this tutorial, we’ll look at how to make your own Minecraft texture pack. Furthermore, we will go through how to publish and distribute these packs with the community. Some exceptionally talented texture pack makers may even be able to get their pack included on the official marketplace and monetized.
How Does a Texture Pack Work
Because of Minecraft’s simplistic blocky and pixelated universe, an in-game texture is nothing more than a picture wrapped around a collection of cubes. These cubes are then combined to form distinct structures, creatures, and even in-game objects. As you might assume, any modifications made to these textures or image files are replicated within your Minecraft environment.
Texture Resolution
These textures have a resolution of 1616 pixels by default. However, gamers may increase the resolution to 128 128 pixels. However, such high-quality textures may not function on every platform. Sticking to a resolution of 1616 pixels or 3232 pixels is therefore your best bet.
Texture Pack Creators
Moving on to the creation, one of the numerous free makers is the simplest way to build Minecraft texture packs. Let’s take a look at the greatest ones on each platform.
Nova Skin Resource Pack Creator for PC Users
Nova skin’s resource maker is the most comprehensive and user-friendly tool for creating a Minecraft texture pack available online. To discover the textures of each model in the game, you receive a tree-like folder structure. Furthermore, it has a paint-like editor that allows you to alter the texture without leaving the site. However, if that isn’t enough, it also allows you to move beyond textures.
You may also change the typeface, audio, effects, and other elements with the Nova skin. In many aspects, it is an all-in-one web tool for quickly creating a full-fledged resource bundle. When you’re finished, you may save your resource pack to the cloud or download it to your Minecraft world.
AddOns Maker for Minecraft PE on Android
This Android software is one of the most popular Minecraft tools on the Google Play market, and we believe it’s for good reason. As one might assume, it includes an editor for painting over existing in-game textures. If you don’t want to do it all by hand, you may select one of the numerous in-app textures and apply it to certain things.

You may also add structures, noises, trees, biomes, and new recipes to the game using the app. Taking texture packs a step further, this program allows you to construct a Minecraft PE modpack. Despite its immense capability, this software has a significant drawback: advertisements. If you can tolerate adverts on virtually every other tap, you can do a lot with the app.
⏬Download Best tool Addons Maker for Minecraft PE⏬
Manually Make Texture Pack for Java Edition
It is quite simple to unlock Minecraft’s texture files and change them in Java version thanks to the unencrypted game files. Contrary to popular belief, you do not need to download anything to manually create a Minecraft Texture pack. Here’s what you’ll require:
- Minecraft Java
- Zip file extractor like Windows Explorer
- Basic image editor like MS Paint
- Text editor like Notepad
All of the above-mentioned programs or their substitutes are most certainly present on your device if you use a Mac, Windows, or Linux.
Extract Minecraft Texture Files
Texture packs are based on custom edits and personal preferences. So, once you know what changes you want to make, follow these steps to edit Minecraft’s textures:
1. To begin, open the game’s directory. If you don’t have it set as custom, paste this address – %appdata%\.minecraft\ in your Explorer address bar or the Run window to open the default location. You can access the Run window through keyboard shortcut “Win + R”.

2. Then in the Minecraft directory, open the “versions” folder. And within in, open the folder with the most recent version of the game. At the moment, it is Minecraft 1.18.1.

3. In the version folder, copy (Ctrl +C) the Jar file with the name of your game’s version number. Unless you have mods installed, it will be the only file with a “.jar” file extension.

4. Then create a new folder within the Minecraft directory or anywhere on your PC and paste (Ctrl + V) the Jar file there. It can have any name.

5. Now, you need to change the file extension from “.jar” to “.zip” by renaming it. Then extract the file by right-clicking on it and choosing the “extract option”. Alternatively, if you have WinZip or WinRAR installed, you can directly extract that Jar file too.

Edit Textures
We only need to change the texture files now that we have everything ready to produce a Minecraft texture pack. Here’s how you do it.
1. First, open the newly extract the folder and reach the “textures” folder. You need to open extracted folder, then “assets”, and finally, the “Minecraft” folder to reach it.

2. Within the texture folder, you will find a variety of subfolders categorically dividing the in-game textures. All the placeable blocks of Minecraft are in the “block” folder. Meanwhile, the animals and mobs are in the “entity” folder. Similarly, you can find folders for the environment, items, and more. Choose the category of texture you want to edit and open its folder.

3. Within the folder, find the PNG texture file you want to edit and open it in paint using the “open with” option. You can also use any other image editor but MS paint is enough to get the job done. Some of these texture files might be in subfolders because of a layering system.

4. Then, within your photo editor, make the edits you want to make without and save the file as PNG in the same location with the same file name. You can repeat the process until all your desired textures are edited.

Create MCMETA File
1. Once you are done editing textures, go back to the main extracted folder that has the “asset” subfolder in it. Then, create a new text file in it by right-clicking and choosing the new option.

2. Then open the text file and paste the following code in it:
{
  "pack": {
    "pack_format": 7,
    "description": "[Custom Description for your Texture Pack]"
  }
}
You can replace the description with your text but please avoid using any special symbols in the same. As for the “pack format” number, you can use the table below to find the appropriate one for your version:
| pack_format | Game Version |
|---|---|
| 5 | 1.15 to 1.16.1 |
| 6 | 1.16.2 to 1.16.5 |
| 7 | 1.17 & above |
3. Finally, save the file using the save as option with the name “pack.mcmeta“. Make sure to select “all files” in the “save as type” drop-down box.
Save & Install Texture Pack
Once every texture you want to change is edited and the “.mcmeta” file is saved in the pack’s folder, it’s time to make your texture pack usable in the game.
1. To make a texture pack file, select the “assets” and the “.mcdeta” files simultaneously by pressing the “ctrl” key. Then right-click and choose the “compress to zip file” option. The file’s name can be anything.

2. Now, to use this newly created texture pack, copy and paste the zip file in one of the following directories:
- %AppData%\.minecraft\resourcepacks (Minecraft 1.16.1 and later)
- %AppData%\.minecraft\texturepacks (Minecraft 1.16 and earlier)

3. Then, load up your game and first click on the “options” button on your home screen and then click on the “resource packs” button within options.

4. Finally, click on the resource pack’s icon to activate your Minecraft texture pack. Doing so will make it move from the left side column to the right side column.

5. With your pack activated, all that’s left for you to do is load up your Minecraft world and look for blocks, items, or entities you made changes to. If you don’t find desired results, head to our FAQ section for a solution.

Create Texture Packs for Bedrock
The Bedrock edition’s texture or resource packs function significantly differently from the Java edition. However, there are no modifications to the texture editing process. Let’s see how it goes.
What Do You Need
To make a texture or resource pack add-on for the Bedrock version, you simply need the following items:
- Minecraft Bedrock (Xbox Gamepass edition also counts)
- Zip file extractor like Windows Explorer
- Basic image editor like MS Paint (use GiMP, Paint 3D or Photoshop if you want to add transparency)
- Text editor like Notepad
- Vanilla resource pack
Unlike the Java edition, you can’t extract the texture files from within the game. So, you have to separately download the vanilla resource pack.
Edit Texture Files
After downloading the vanilla resource pack, proceed with the following procedures to alter your Bedrock texture pack:
1. Extract the vanilla resource pack zip file in a new folder. You can use any file management software to extract it. If you are on windows then you can right-click on the file and choose the “extract all” option.

2. Then, in the newly extracted folder find the subfolder called “textures” and open it.

3. In the folder, “textures”, you will find categorically divided subfolders of Minecraft textures. Open the one whose texture you want to edit.

4. In each categorical folder, there are either PNG, TGA, or subfolders with PNG and TGA files for that in-game texture. Open the texture’s PNG file in paint to edit it. If you are editing a TGA file, you can use Adobe Photoshop or GiMP instead.
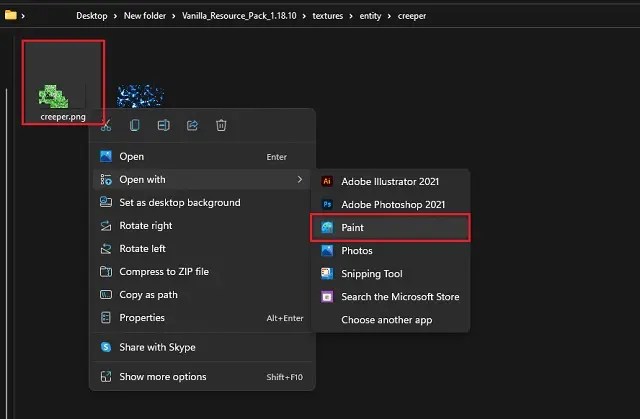
5. Make your desired changes to the texture in your image editor and save it at the same location with the same name as the original file. Repeat the process for all textures you want to edit.

Prepare the JSON File
Once you’ve finished modifying, proceed with the steps below to prepare the resource pack’s JSON file. This file communicates with the game, allowing our external textures to replace the game’s built-in textures.
1. To prepare a JSON file, we need two UUID codes. It can be generated using this tool. Generate two unique UUIDs and note them down to be used later on. Make sure to generate version 1 UUIDs only using the linked tool.

2. Next, make a new text file in the main folder that had the “textures” subfolder in it earlier. Then open it using Notepad or any other basic text editor.

3. Paste the following code in your text editor:
{
  "format_version": 2,
  "header": {
    "description": "Tutorial Resource Pack",
    "name": "Tutorial Resource Pack",
    "uuid": "dcf11606-8e52-11ec-b909-0242ac120002",
    "version": [1, 0, 0],
    "min_engine_version": [1, 17, 30]
  },
  "modules": [
    {
      "description": "Tutorial Resource Pack",
      "type": "resources",
      "uuid": "3f958580-8e53-11ec-b909-0242ac120002",
      "version": [1, 0, 0]
    }
  ]
}
In both portions of the code, you may insert any text before the name and description of your texture pack. In terms of UUIDs, use the ones you produced before and avoid using the same UUID in both areas. Leave the remainder of the code alone because a single extra or missing symbol might render the file unusable.
4. Finally, save the file as “manifest.json“. Make sure to select “all files” in the “save as type” drop-down box. Don’t forget to double-check the lines of code and avoid using any special characters in your pack name or its description.

Install and Test Minecraft Texture Pack for Bedrock
Follow these steps to add the texture pack to your Minecraft Bedrock:
1. First, to make your pack your own, rename the extracted “vanilla resource pack” folder to the name of your choice. Please avoid using any symbols in the folder name.

2. Open the “resource packs” folder of your Minecraft Bedrock. Depending upon your device, the folder address in the default installation location will look like the following:
On Windows 10 and 11:
%localappdata%\Packages\Microsoft.MinecraftUWP_8wekyb3d8bbwe\LocalState\games\com.mojang\resource_packs
On Android:
/storage/emulated/0/Android/data/com.mojang.minecraftpe/files/games/com.mojang/resource_packs
On iOS:
/files/on%20my%20iphone/minecraft/games/com.mojang/resource_packs
3. Then, copy and paste your resource pack folder into your Minecraft directory’s “resource packs” folder. Make sure that no files are missing from your resource pack especially the JSON and texture files.

4. Finally, open your Minecraft Bedrock and click on the “settings” tab on the homescreen.
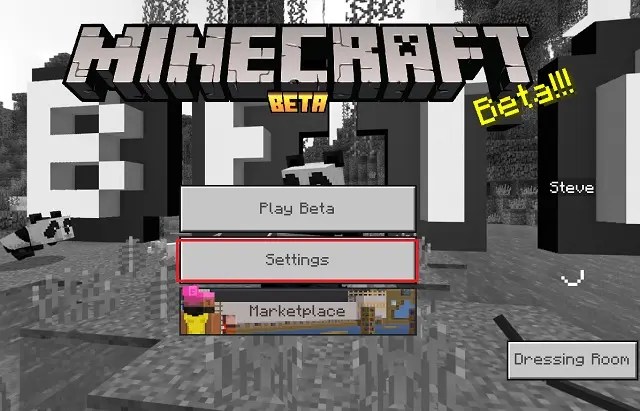
5. Within the settings, click on the “global resources” button in the left side pane.

6. Here, you will your resource pack under the “my packs” section. Click on the pack and then on the “activate” button to apply it.
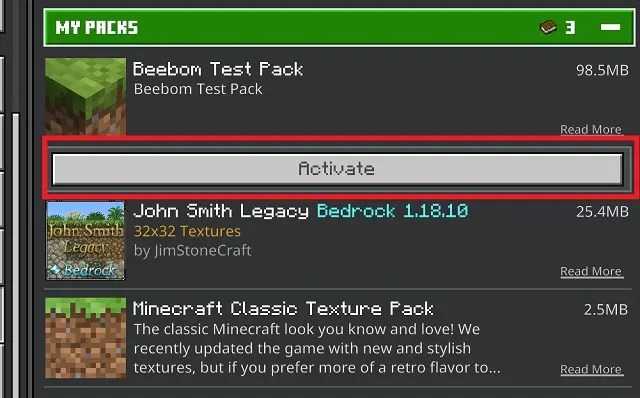
7. Then open your Minecraft world and find your edited textures in the game.

Distribute Your Minecraft Texture Pack
Congratulations! You now have the ability to fully alter the appearance of your Minecraft environment. You now understand how to create a Minecraft texture pack and apply it to any edition of the game. The logical next step is to share it. Fortunately, it is far less difficult than modifying a texture.
Share the Pack for Java Edition
Users of the Java edition can immediately share the archived file of their resource/texture pack. Any user can download and install the file as long as it contains the “.zip” file extension. To avoid bugs, they should only use it on the version for which it was designed.
Share for Bedrock Edition
Unlike the Java edition, you cannot immediately share your resource pack folder with other players. However, by making a few little adjustments, you may make the installation process much easier for everyone. Here’s how you do it.
Create MCPACK File
Follow these steps to create an MCPACK file for your resource/texture pack:
1. To begin, we need to archive our texture pack folder into a zip file. You can do so by right-clicking on it and selecting the “compress to zip file” option on Windows. Alternatively, you can also use software like WinZip, Winrar, and more on most platforms.

2. Now, rename the file to “your pack name.mcpack”. You need to replace the “.zip” file extension with the “.mcpack” file extension. The pack’s icon will also immediately change to the Minecraft icon.

3. Any player can then double click on the MCPACK file to immediately add the texture pack to their Minecraft Bedrock. This makes the installation and distribution much easier and faster. The installation process takes only a couple of minutes, and the game displays an “import successful” notification once it’s completed.

Minecraft Partner Program
The texture pack file for the Bedrock edition may be shared on the same community sites as the Java edition. However, the makers also provide an official location where you may share and even sell your texture packs. Yes, we’re referring to the official Minecraft store, which is only available in Bedrock.

However, only a few authors are permitted to contribute their material to the Minecraft marketplace. To join this restricted group, use this link to apply for the Microsoft or Minecraft Partner Program. Individuals and businesses can both register using the same application form. In terms of selection criteria, the developers will go over your creative portfolio, which should include example texture packs, skins, or add-ons for Minecraft Bedrock.
Enable RTX for these textures
Finally, we have the well-known ray-tracing mechanics, which may take your texture packs to the next level. Due to platform constraints, the RTX for Minecraft Bedrock only works with the Windows edition of the game. Your texture pack must include PBR-enabled textures in order to operate with ray tracing.
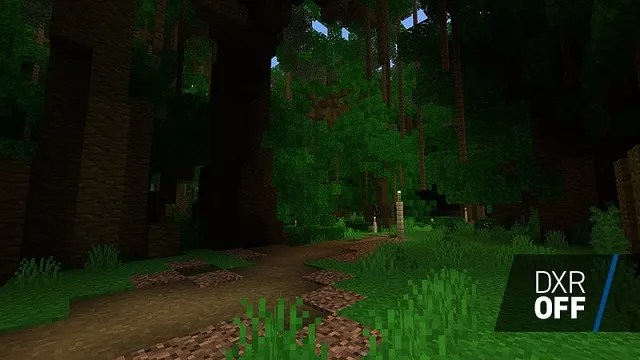
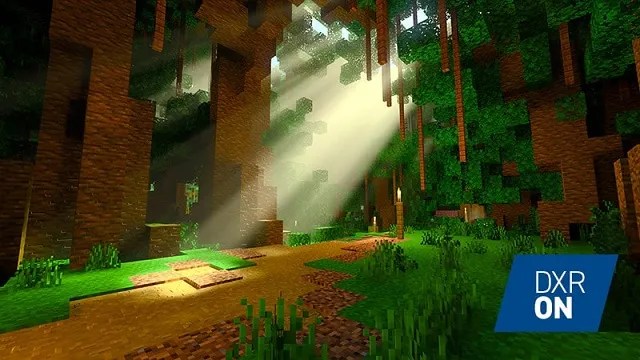
The real procedure of activating PBR will take this instruction to a whole new level. However, if you are interested, you may follow the official NVIDIA tutorial to make your Minecraft texture pack RTX ready.
Frequently Asked Questions – FAQ
How to See The File Extension
You may get “folder options” on Windows by looking for them in the start menu. The option to “hide file extensions for known file types” will then appear in the display section. Uncheck it to see all of your system’s file extensions.

Mac users can enable the “display all filename extensions” option in the Finder app’s advanced options.
What Should be Extension of Texture Pack
Only texture packs with a “.zip” file extension may be installed in Minecraft Java. Meanwhile, Bedrock users can either use the “.mcpack” file extension or add the texture pack files directly in the game’s directory.
Incompatible Version Warning
If you use a texture on a version greater or lower than the one for which it was designed, the game will display a “incompatible” warning. You may still utilize the texture pack, however your textures may have some issues. This warning also appears if you use the texture packs on a beta or snapshot version of the game.
What is UUID
A UUID, or globally unique identifier, is a digital label that is used to identify data in a game. By include one in your Minecraft texture pack, you ensure that the game does not mistake your custom pack with any other texture pack or the in-game textures.
The Texture Didn’t Change Even after Applying the Minecraft Texture Pack
The texture pack may not function properly in one of the following scenarios:
- You’re playing an incompatible version of the game.
- The texture pack was not stored correctly, with the correct name or extension.
- If the texture contains a TGA file of the same texture but you just altered the PNG version, the game will not recognize it.
Which Texture File Should I Edit: PNG, JPEG or TGA
Minecraft is set up to check for TGA files first, then PNG files, and lastly JPEG texture files. So, if you’re merely changing a PNG file for a texture, erase the TGA file so that your texture can be identified. Because JPEG does not allow transparency, you should avoid using it for the Bedrock edition.
How to Change Icon of the Texture Pack
You may change the icon of your texture pack by placing a PNG file with the desired icon in the main texture pack folder. The icon should be 256 X 256 pixels in size. The icon file should be called “pack icon.png” for the Bedrock edition and “pack.png” for the Java edition. If you’re making an MPACK or ZIP file of your pack, ensure sure the icon file is included.
Can I Use My Texture Pack in Multiplayer
You may freely utilize your texture or resource pack on an online server because the packs only effect the user. Most popular servers, however, already have a resource pack in place for users. Not to mention that gamers have a history of using texture packs to find uncommon goods. As a result, several online servers have outright prohibited the use of texture packs.
Easily Make Your Minecraft Texture Pack Today
You now know all there is to know about creating a Minecraft texture pack. You may use the method to create a texture pack for any edition of Minecraft, whether for business or personal reasons. Just try not to steal someone else’s pack ideas. Even with such a wide range of Minecraft material, there are always fresh themes to uncover, and the mobs in Minecraft 1.19 may be rather inspirational. If simply modifying the game’s appearance isn’t enough for you, one of the greatest Minecraft modpacks could be able to please you. These modpacks not only update in-game graphics, but they also bring a range of changes to the game at the same time. To use them, you must first install Forge in Minecraft.
Returning to the texture packs, you may improve their appearance by applying shaders in Minecraft. These shaders require the installation of Optifine to function, but once installed, your game’s visuals can compete with RTX graphics. That being said, if you have any questions on creating a texture pack, please leave them in the comments. Someone from our team will be on hand to assist you. The process of creating a Minecraft texture pack is time-consuming and labor-intensive, but it is also quite gratifying. Good luck and happy crafting!


